
TL; D
In this tutorial, we will go to you during a step -by -step process to build Investment and savings operating in Amnesty International Copilot This helps you to plan your savings and investments using


This is what we will cover:
-
Building the Next.js project to invest and provide artificial intelligence.
-
Add the ingredients of Copilotkit user interface and API points to your application.
-
Perhaps API financing to provide visions for investment and savings.
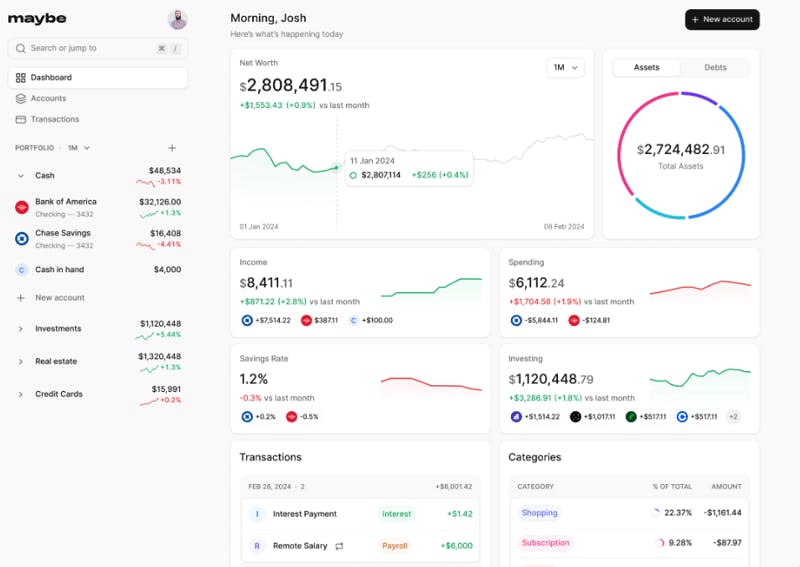
Below is a preview of the application of the financing -backed financing application from artificial intelligence:
Let’s start!
What is Copilotkit

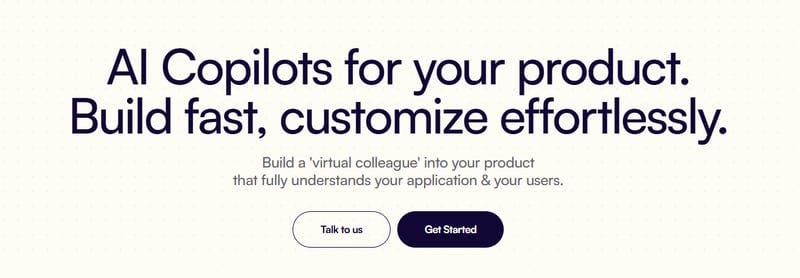
This allows you to determine the role of Copilot without dealing with complex settings or integration.
Check the GitHub from Copilotkit ⭐
What may be funding?

In our project, we will take advantage of data and analyzes in the real time in Finance to run our Copilot visions-which improves users and investments.
Basic requirements
Before we start, make sure you have:
Technical knowledge
Required accounts
Development environment
Once you get this screening, we will start development! 🚀
This is the web application that we will build.


Project preparation
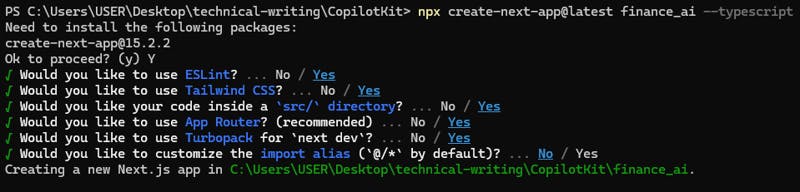
1. Create a new Next.js project
Open your station and run this to create a new Next.js project
npx create-next-app@latest finance_ai --typescript

Go to the project guide and start the Development Custodian:
cd finance_ai
npm run dev
Your application must now work in


2. Install packages
After that, let’s prove the necessary dependencies for this project. These include:
-
Copilotkit packages.
-
Axios (to bring in the application programming interface)
-
Shadcn/UI (for the user interface components in advance)
-
Recharge (to represent the plan)
Run the following order to install it:
npm install @copilotkit/react-ui @copilotkit/react-core axios
Then, for Shadcn Ui, run this
npx shadcn@latest add button card input label badge tabs
Note: If you use Copilotkit Cloud, you will not need to include a time package, as Copilotkit Cloud automatically runs the operating time environment. However, if you are hosting the back interface, you may need to handle manually operating configurations. In this tutorial, we will focus on self -hosting, but keep in mind that Copilotkit Cloud is an option that simplifies the management time management.
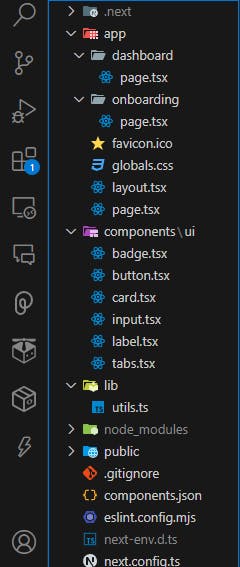
Now, let’s create the project structure. The main files and evidence that we will create:
-
src/app/ui/service/index.ts– API calls to bring in financial statements. -
src/app/ui/components/FinanceCopilot.tsxThe main user interface component of the financial assistant with artificial intelligence. -
src/app/lib/types/investment.ts– It defines the types of Typescript for investment and savings data. -
src/app/lib/data/mockData.ts– Contains financial data for the test. -
src/app/api/copilotkit/route.ts– API’s end point for Copilotkit. -
src/app/api/finance/route.ts– Application programming interface to bring in financial visions.
Project structure
Below is the file tree for our application:

Building the front facade of artificial intelligence
1. Preparing global service providers in layout.tsx
First, go to

Then, copy the API key and save it in .env file. Next, update your global design to wrap your application using the Copilotkit supplier. This makes Copilot functions available during your application.


Now after his appointment, enter the symbol below in this guide finance_ai/app/layout.tsx
import { Metadata } from "next";
import { Geist, Geist_Mono } from "next/font/google";
import "./globals.css";
import { CopilotKit } from "@copilotkit/react-core";
import "@copilotkit/react-ui/styles.css";

// Load fonts for styling
const geistSans = Geist({
  variable: "--font-geist-sans",
  subsets: ["latin"],
});
const geistMono = Geist_Mono({
  variable: "--font-geist-mono",
  subsets: ["latin"],
});

// Metadata for SEO and display
export const metadata: Metadata = {
  title: "Coyamin - AI Investment Copilot",
  description: "Make informed financial decisions with AI-powered insights.",
};

// Retrieve the Copilot API key from environment variables
const copilotApiKey = process.env.NEXT_PUBLIC_COPILOTKIT_API_KEY;

export default function RootLayout({
  children,
}: Readonly<{ children: React.ReactNode }>) {
  return (
    <html lang="en">
      <body className={`${geistSans.variable} ${geistMono.variable} antialiased`}>
        {/* Conditionally wrap with CopilotKit if the API key is available */}
        {copilotApiKey ? (
          <CopilotKit publicApiKey={copilotApiKey}>{children}</CopilotKit>
        ) : (
          <>{children}</>
        )}
      </body>
    </html>
  );
}
In the code above, we start importing international patterns and lines, and ensuring a fixed design throughout the application.
After that, we turn the application with CopilotKit Provider to use the API key; <CopilotKitProvider apiKey={process.env.NEXT_PUBLIC_COPILOTKIT_API_KEY}><App /> </CopilotKitProvider>
This setting makes the AI function available across all components in the app.
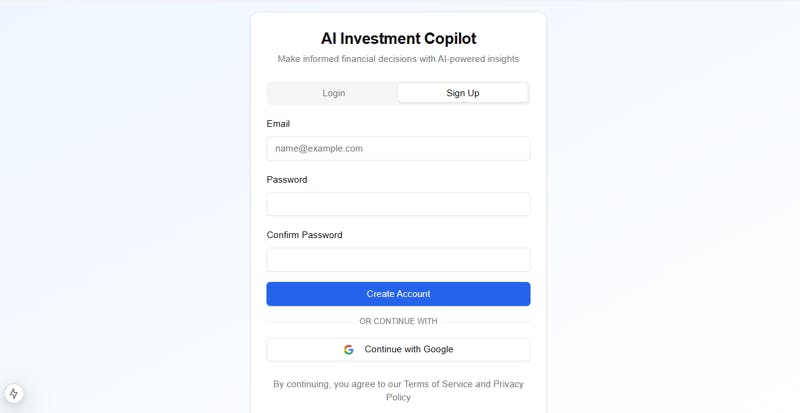
2. Create login screens and screens on the plane
To create a login form component, enter this symbol in app/api/auth/[...nextauth]/route.ts:
import NextAuth from "next-auth";
import GoogleProvider from "next-auth/providers/google";
import { PrismaAdapter } from "@auth/prisma-adapter";
import { prisma } from "@/lib/db";

export const authOptions = {
  adapter: PrismaAdapter(prisma),
  providers: [
    GoogleProvider({
      clientId: process.env.GOOGLE_CLIENT_ID as string,
      clientSecret: process.env.GOOGLE_CLIENT_SECRET as string,
    }),
  ],
  callbacks: {
    async session({ session, user }) {
      if (session?.user) {
        session.user.id = user.id;
        session.user.isOnboarded = user.isOnboarded;
      }
      return session;
    },
  },
  pages: {
    signIn: "/",
  },
};

const handler = NextAuth(authOptions);
export { handler as GET, handler as POST };
The authentication page is divided into tab: Log in and register. Each model of the input fields is used and a button that restores the on the onboarding page when the successful approval.

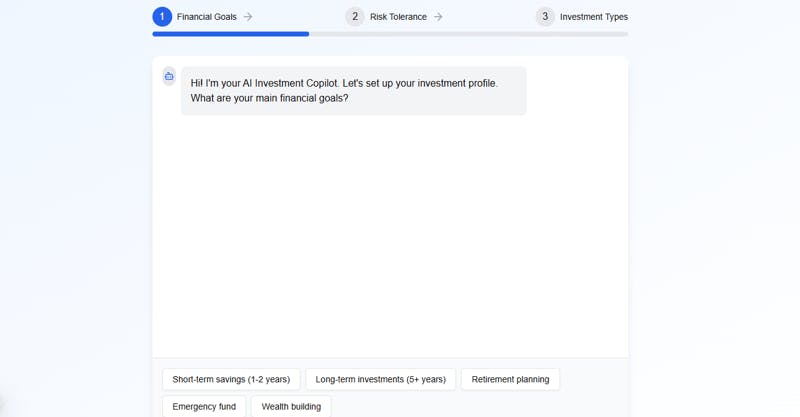
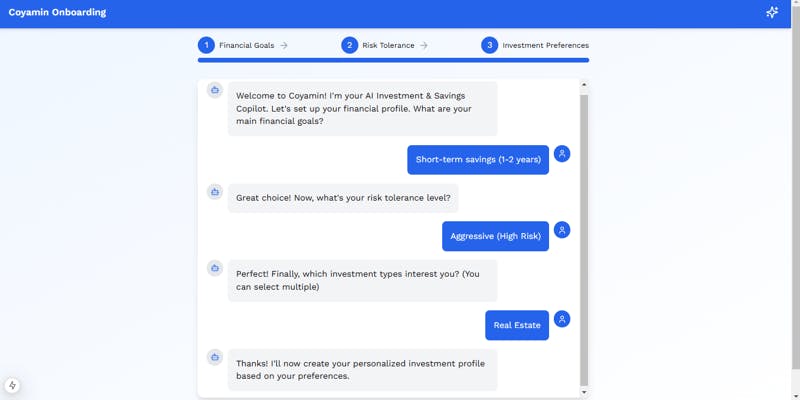
The Onboarding Page
The onboarding page has a chat interface that asks questions such as financial goals, risk tolerance, and investment preferences as part of the onboarding process.
In the app/onboarding Guide, creation a page.tsx The file and enter this symbol:
"use client"

import { useState, useEffect } from "react"
import { useRouter } from "next/navigation"
import { Button } from "@/components/ui/button"
import { Card, CardContent } from "@/components/ui/card"
import { Badge } from "@/components/ui/badge"
import { ArrowRight, Bot, User, Sparkles } from "lucide-react"

interface Message {
  type: "bot" | "user"
  content: string
  options?: string[]
}

export default function OnboardingChat() {
  const router = useRouter()
  const [messages, setMessages] = useState<Message[]>([
    {
      type: "bot",
      content: "Welcome to Coyamin! I'm your AI Investment & Savings Copilot. Let's set up your financial profile. What are your main financial goals?",
      options: [
        "Short-term savings (1-2 years)",
        "Long-term investments (5+ years)",
        "Retirement planning",
        "Emergency fund",
        "Wealth building",
      ],
    },
  ])
  const [currentStep, setCurrentStep] = useState(0)
  const [selectedOptions, setSelectedOptions] = useState<Record<number, string[]>>({})
Here, we import the Shadcn button, the user interface, card components and police, as well as adding status management with import { useState, useEffect } from "react". We also include OnboardingChat() A job with a message to welcome the user and ask about their financial goals, which can choose from the options as shown below:

User selection processing and chat flow
When selecting an option, Chatbot responds dynamically and progresses across different stages of innovation. We also include drop -down explaining every level of risk tolerance:
// Define the steps of the onboarding process
  const steps = [
    { title: "Financial Goals", progress: 33 },
    { title: "Risk Tolerance", progress: 66 },
    { title: "Investment Preferences", progress: 100 },
  ];

  const handleOptionSelect = (option: string) => {
    setMessages((prev) => [...prev, { type: "user", content: option }]);
    setSelectedOptions((prev) => ({
      ...prev,
      [currentStep]: [...(prev[currentStep] || []), option],
    }));

    setTimeout(() => {
      if (currentStep === 0) {
        setMessages((prev) => [
          ...prev,
          {
            type: "bot",
            content: "Great choice! Now, what's your risk tolerance level?",
            options: ["Conservative (Low Risk)", "Moderate (Medium Risk)", "Aggressive (High Risk)"],
          },
        ]);
        setCurrentStep(1);
      } else if (currentStep === 1) {
        setMessages((prev) => [
          ...prev,
          {
            type: "bot",
            content: "Perfect! Finally, which investment types interest you? (You can select multiple)",
            options: ["Stocks", "ETFs", "Bonds", "Crypto", "Real Estate", "Mutual Funds"],
          },
        ]);
        setCurrentStep(2);
      } else if (currentStep === 2) {
        setMessages((prev) => [
          ...prev,
          {
            type: "bot",
            content: "Thanks! I'll now create your personalized investment profile based on your preferences.",
          },
        ]);
        setTimeout(() => {
          router.push("/dashboard");
        }, 1500);
      }
    }, 500);
  };
3. Create a dashboard
The dashboard offers an overview of the recommendations created by artificial intelligence. Enter the symbol excerpts below in app/dashboard/page.tsx
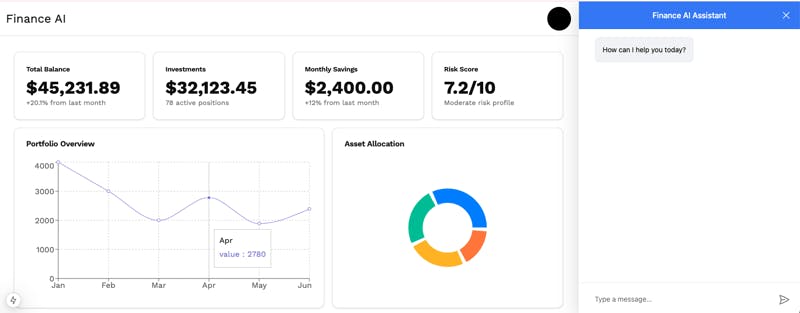
Merging the dashboard cover with the Copilotkit sidebar
This surrounds the entire dashboard withCopilotSidebar Component and preparation of the main flexible container of the dashboard content.
"use client"

import { CopilotSidebar } from "@copilotkit/react-ui";

export default function DashboardPage() {
  return (
    <CopilotSidebar
      defaultOpen={true}
      instructions="You are assisting the user as best as you can. Answer in the best way possible given the data you have."
      labels={{
        title: "Coyamin Assistant",
        initial: "How can I help you today?",
      }}
    >
      {/* Main container: fills the available viewport height */}
      <div className="flex h-[calc(100vh-3.5rem)]">
        <div className="flex-1 p-4 sm:p-6 lg:p-8 overflow-auto">
          {/* Dashboard content goes here */}
        </div>
      </div>
    </CopilotSidebar>
  );
}
the CopilotSidebar The AI chat interface provides continuous, while the flexible container (div with flex h-[calc(100vh-3.5rem)]The occupation of the dashboard ensures the full height of the width port, from which the head is removed.
Also, the inner container ( <div className="flex-1 p-4 sm:p-6 lg:p-8 overflow-auto">Lent and passable, ready to hold our general components and plans.
Implementing a minus optical cards in the dashboard
The "Overview" section of the dashboard determines a network of cards, each displays a major financial scale Total balance, investments, monthly savings and risk degree.
Still in page.tsx File, enter the code below:
<div className="grid gap-4 sm:grid-cols-2 lg:grid-cols-4">
  <Card>
    <CardHeader className="flex flex-row items-center justify-between space-y-0 pb-2">
      <CardTitle className="text-sm font-medium">Total Balance</CardTitle>
    </CardHeader>
    <CardContent>
      <div className="text-xl sm:text-2xl font-bold">$45,231.89</div>
      <p className="text-xs sm:text-sm text-muted-foreground">+20.1% from last month</p>
    </CardContent>
  </Card>
  <Card>
    <CardHeader className="flex flex-row items-center justify-between space-y-0 pb-2">
      <CardTitle className="text-sm font-medium">Investments</CardTitle>
    </CardHeader>
    <CardContent>
      <div className="text-xl sm:text-2xl font-bold">$32,123.45</div>
      <p className="text-xs sm:text-sm text-muted-foreground">78 active positions</p>
    </CardContent>
  </Card>
  <Card>
    <CardHeader className="flex flex-row items-center justify-between space-y-0 pb-2">
      <CardTitle className="text-sm font-medium">Monthly Savings</CardTitle>
    </CardHeader>
    <CardContent>
      <div className="text-xl sm:text-2xl font-bold">$2,400.00</div>
      <p className="text-xs sm:text-sm text-muted-foreground">+12% from last month</p>
    </CardContent>
  </Card>
  <Card>
    <CardHeader className="flex flex-row items-center justify-between space-y-0 pb-2">
      <CardTitle className="text-sm font-medium">Risk Score</CardTitle>
    </CardHeader>
    <CardContent>
      <div className="text-xl sm:text-2xl font-bold">7.2/10</div>
      <p className="text-xs sm:text-sm text-muted-foreground">Moderate risk profile</p>
    </CardContent>
  </Card>
</div>
all Card It consists of a head (CardHeader and CardTitle) For naming and content (CardContent) To obtain the metric value and description. Network planning (grid gap-4 sm:grid-cols-2 lg:grid-cols-4It is to ensure that the cards are far apart and equal response.
Add plans with recharge
We use recharge to create two types of plans in the application:A line scheme for a general view of the wallet and a pie scheme to customize the assets. These plans are the perception of financial trends and the distribution of assets clearly. For more details about recharge, check out
Run this to install recharge:
npm install recharts
Then add this symbol to page.tsx File in the Driver Guide:
import {
  LineChart,
  Line,
  XAxis,
  YAxis,
  CartesianGrid,
  Tooltip,
  ResponsiveContainer,
  PieChart,
  Pie,
  Cell,
} from "recharts";

const chartData = [
  { name: "Jan", value: 4000 },
  { name: "Feb", value: 3000 },
  { name: "Mar", value: 2000 },
  { name: "Apr", value: 2780 },
  { name: "May", value: 1890 },
  { name: "Jun", value: 2390 },
];

const pieData = [
  { name: "Stocks", value: 400 },
  { name: "Bonds", value: 300 },
  { name: "Real Estate", value: 300 },
  { name: "Crypto", value: 200 },
];

const COLORS = ["#0088FE", "#00C49F", "#FFBB28", "#FF8042"];

export default function ChartsSection() {
  return (
    <div className="grid gap-4 sm:grid-cols-1 md:grid-cols-2 lg:grid-cols-7 mt-4">
      {/* Portfolio Overview - Line Chart */}
      <div className="col-span-1 md:col-span-2 lg:col-span-4">
        <div className="border rounded shadow p-4">
          <h3 className="text-lg font-semibold mb-2">Portfolio Overview</h3>
          <ResponsiveContainer width="100%" height="250px">
            <LineChart data={chartData}>
              <CartesianGrid strokeDasharray="3 3" />
              <XAxis dataKey="name" />
              <YAxis />
              <Tooltip />
              <Line type="monotone" dataKey="value" stroke="#8884d8" />
            </LineChart>
          </ResponsiveContainer>
        </div>
      </div>

      {/* Asset Allocation - Pie Chart */}
      <div className="col-span-1 md:col-span-2 lg:col-span-3">
        <div className="border rounded shadow p-4">
          <h3 className="text-lg font-semibold mb-2">Asset Allocation</h3>
          <ResponsiveContainer width="100%" height="250px">
            <PieChart>
              <Pie data={pieData} innerRadius={50} outerRadius={80} paddingAngle={5} dataKey="value">
                {pieData.map((entry, index) => (
                  <Cell key={`cell-${index}`} fill={COLORS[index % COLORS.length]} />
                ))}
              </Pie>
              <Tooltip />
            </PieChart>
          </ResponsiveContainer>
        </div>
      </div>
    </div>
  );
}
In the code above, Line scheme (wallet overview) Use ResponsiveContainer To ensure that the graph is completely responded. the LineChart Ingredient plots with data with a CartesianGrid For the visual reference, while XAxis and YAxis Provide posters for reading ability. Using a recharge in this normative way keeps the code clear and maintenance.
Then, update pages/index.tsx To view the dashboard in the main app.
import Dashboard from '../components/Dashboard';

export default function Home() {
  return (
    <main className="min-h-screen bg-gray-100 p-10">
      <Dashboard />
    </main>
  );
}
4. Prepare the rear end points
Copilotkit end point
in pages/api/copilotkit.tsPrepare the end of the back interface point to treat requests from Copilot UI. This end point will redirect requests to our artificial intelligence engine (and interface with perhaps funding):
import { NextApiRequest, NextApiResponse } from 'next';
import { copilotRuntimeNextJSAppRouterEndpoint } from '@copilotkit/runtime';
Perhaps API ending
Now, let's combine financing, maybe with our Coyamin app. We will create many API methods that act as safe mediators between the front facade and possibly financial API.
First, prepare the environmental variables to store our API accreditation data:
API_KEY=your_maybe_finance_api_key
BASE_URL=https://api.synthfinance.com


We will create a series of API methods that will work as our financial data line. Each track will deal with a specific type of financial statements:
API currency information
This brings different currencies to any required information during the chat. constructionroute.ts File app/api/rates/live guide:
import { NextResponse } from "next/server";
import axios from "axios";

const API_KEY = process.env.API_KEY;
const BASE_URL = process.env.BASE_URL;

export async function GET(req: Request) {
  try {
    const { searchParams } = new URL(req.url);
    const to = searchParams.get("to");

    if (!to) {
      return NextResponse.json(
        { message: "Missing required query parameter: to" },
        { status: 400 }
      );
    }

    const response = await axios.get(`${BASE_URL}/rates/live`, {
      params: { to },
      headers: {
        Authorization: `Bearer ${API_KEY}`,
        Accept: "application/json",
      },
    });

    return NextResponse.json(response.data, { status: 200 });
  } catch (error: unknown) {
    if(error instanceof Error) {
      return NextResponse.json(
        { message: "Error fetching live rates", error: error.message },
        { status: 500 }
      );
    }
    return NextResponse.json(
      { message: "Error fetching live rates"},
      { status: 500 }
    );
  }
}
This end point allows you to know how to change the values of currency and investment opportunities over time to make data -dependent decisions.
5. Run the application
Start your development server:
npm run dev
Open
Registration page


On the plane

The result is a financing app that works at full capacity of artificial intelligence using Copilotkit:
To clone the project from __github__, run it locally, open your station and run this:
git clone https://github.com/Tabintel/finance_ai.git
Then rannpm install To install all the necessary dependencies for the project npm run dev To run the web app.
summary
In this guide, we went through an artificial investment building and providing artificial intelligence using Copilot using
Although we have covered the main features, this is only the beginning-COPILOTKIT allows countless AI use cases, of financial assistants for smart automation in Fintech applications.
Check the full source code on Gabbab
Follow Copilotkit on
adxpro.online